|
CamToForum |
 FREE! |
|||||||
        |
CamToForum was designed to do what all those other programs don't seem to think is important: crop, resize, and recompress an image all in one step. You don't have to open this dialog then that control then click save. You just double click and you're done! For those who take a lot of photos and like to post them on forums, this app will help out tremendously. Features: 1- Cropping rectangle stays within range of aspects. You specify the min and max, and it will keep the cropped image within that range automatically. If the max and min are the same, it locks the aspect. No more guessing! 2- Automatic resizing. Once you've set the max width and height, you'll never have to set them again. Pics can be downsized to 800*600 (for example) and there's a setting for whether or not to enlarge pics that are already smaller. 3- Automatic FILE SIZE. The photo is saved at the highest quality level that will still fit under the KB limit. 4- Brightness/Contrast/Gamma adjustment. No windows to open, just use the arrows and the +/- keys. 5- Batch Resize and Thumb generation. Photos are resized at the specified size, and thumbnails are simultaneously generated at a user-specified size. How To Use: Cropping/Resizing 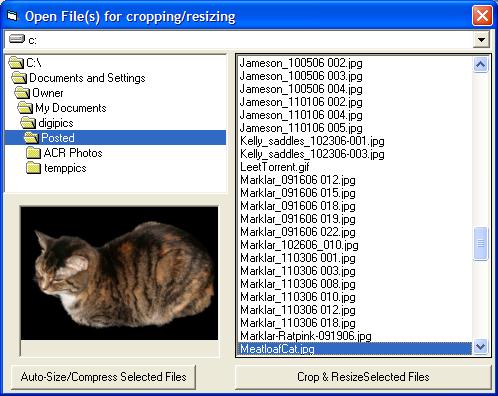 Select the file or files you want to work on. These will be presented to you for editing. 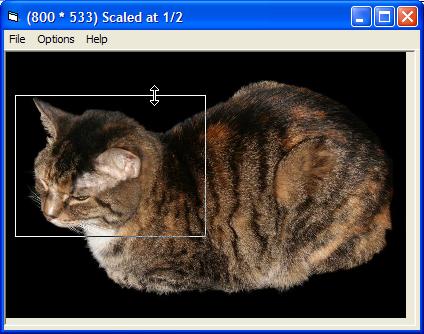 1- Select the area you want to keep by moving/sizing the cropping area with your mouse. 2- When you've got it, double click the mouse, or hit the enter key. Your image will be cropped, resized, and saved to disk. If you still have more images you selected, the next one will appear for you to crop.  If you want to adjust brightness, contrast, and/or gamma, use the up/down/left/right arrows and the +/- keys, and hit enter or escape to continue. Download CamToForum. Settings: The one-time setup involves setting your basics, and then you're done changing settings. If you need to change them later, go into the program and select an image file and click the "Crop & Resize" button, change your settings, and then exit the program. 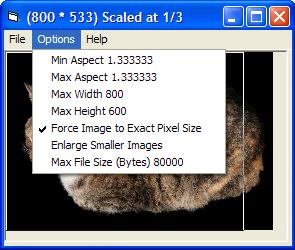 The settings are: Min and Max Aspect Ratio - If you're unsure, just leave the aspect at 1.3333333, or experiment with different values. This is the width divided by height. The most common is 4/3 (640*480, 800*600, etc) and it's entered as 1.333333. Another example is our camera which uses a 1.5 aspect that sizes down to 800*533. You can set this at anything you want, it doesn't have to match the camera's aspect. If you leave a range for the aspect ratio, you should turn off the "Force Image to Exact Pixel Size" setting. Max Width and Max Height - These are expressed in Pixels. Default is 800 X 600. Force Image to Exact Pixel Size - If checked, images that normally might end up at 800*599 (instead of 600) will be forced to that exact size. Default is checked. If your min and max aspects are two different numbers, uncheck this setting to avoid having images stretched during resizing. Enlarge Smaller Images - If the cropped image (or during a batch, the original image) is smaller than the max size, it will be stretched to make it that large. By default this feature is off, since upsizing images generally does not improve their quality. Max File Size (bytes) - This is the max number of bytes that your files will be saved at. They will generally be a tiny bit smaller than the specific amount. Set Output Folder - This option is in the File menu. You are allowed to change your output folder at any time. |
|
||||||
 All content on this site, unless otherwise noted, is Copyright 2000-2011, Serpentine Widgets. The background, banner, buttons, and footer are original creations by Charles Pritzel+ Privacy Policy | ||||||||